A2A (Agent2Agent) is a protocol for AI agents to collaborate with each other. By using A2A, it becomes possible for AI agents built by different vendors or with different frameworks to communicate with each other. As an example of such communication, one could imagine a scenario where an internal "accounting agent" (client) requests a "tax check agent" (remote) operated by an external tax accountant firm to check monthly journal entries.
In this example, let's say the external tax accountant firm does not want to expose the tax check agent publicly on the internet. To meet such needs, Seera Networks, Inc. has developed and released ISEKAI portal. ISEKAI portal is an application that runs on top of ISEKAI link, whose mechanism was introduced in a past article. In this article, as a demonstration, I would like to introduce an example of connecting to helloworld-server included in a2a-rs, which is an implementation of A2A written in Rust, via ISEKAI portal using a2acli, which is also included in a2a-rs.
Note that terms from ISEKAI link such as Endpoint and Grant appear in this article. An Endpoint is an endpoint identified by a key, and a Grant is a time-limited permission that allows a specific Endpoint to connect to a Listener. A Listener is a gateway through which portal-server, etc. waits for connections. For details, please refer to the past article.
Also, since we use a2a-rs, both the local Windows environment and the remote Linux environment need the Rust toolchain and git. On Windows, MSVC build tools (Visual Studio Build Tools) are also required.
Installing ISEKAI portal
Since ISEKAI portal publishes its source code under the MIT license, you can clone the repository and build it yourself. However, since the build process is a bit of a hassle, it is convenient to download pre-built binaries from Releases. Currently, binaries are available for the following three platforms:
- Windows (amd64)
- Linux (Ubuntu, amd64)
- Mac (arm64)
All binaries are provided in zip format, and when extracted, a directory with the same name as the file is created (on Windows, portal-windows-latest), so add it to your PATH. Now you are ready to run it from the terminal.
Setting up ISEKAI portal
Once installed, perform the setup. In the following, I will explain under the assumption that the server runs on Linux and the client runs on Windows.
Setting up portal-server
Preparation for setup
If you are accessing the Linux machine running the server remotely, forward TCP port 38700 locally using ssh as follows.
PS C:\Users\foo> ssh -L 38700:127.0.0.1:38700 foo@bar.example.com
As described later, login must be performed via a web browser, and after logging in, the web browser connects to TCP port 38700 opened by portal-server. When accessing remotely, however, TCP port 38700 is open on the remote Linux machine, so it needs to be forwarded to the local environment. This step is not necessary if you are operating Linux locally.
Also, create a directory to store the configuration files used by ISEKAI portal.
$ mkdir -p ~/.config/ISEKAI-portal
Agreeing to the privacy policy
Using ISEKAI link requires signing up, and at that time you are asked to agree to the privacy policy that defines how personal information collected is handled. When you start portal-server, the privacy policy is displayed, so please review it and run the following command to agree. Until agreement is given, portal-server will display the privacy policy and exit.
$ portal-server --accept-privacy-policy
The privacy policy is also published on the web (Japanese version and English version).
Logging in
ISEKAI link uses Auth0 for account management. Logging in is required to use it. To log in, run the following command (the --key option specifies the file of the Endpoint's private key, but since the file that stores login information is created in the same directory, it is also specified here).
$ portal-server --key ~/.config/ISEKAI-portal/portal-server.pem --login
When started, a URL is displayed, so access it with a web browser. When you access it, a screen saying "Enter Your Organization" appears, so click "Continue with personal account." Then a login screen saying "Welcome" appears, so if you already have an account, log in. If you do not have an account, click "Sign up" to move to the account creation screen. An account can be created with an email address and password, but it can also be created with a Google account or a GitHub account.
Creating the configuration file
In ISEKAI portal, the connection destination is specified by the service name. The portal-server configuration file is used for this setting. Here, save it as ~/.config/ISEKAI-portal/portal-server.toml with the following contents.
[service.a2a]
protocol = "tcp"
target   = "127.0.0.1:3000"
Starting portal-server
Now that preparation for startup is complete, run portal-server as follows. --key specifies the path to the private key; if the file does not exist, a private key is generated. If the file exists, the private key is read from it. --register must be specified if the Endpoint is not yet registered. On the first startup, a private key is generated and a new Endpoint is created, so --register is required. From the second time onward, do not add it (adding it will cause an error).
$ portal-server --key ~/.config/ISEKAI-portal/portal-server.pem --config ~/.config/ISEKAI-portal/portal-server.toml --register
Setting up portal-client
The setup for portal-client is almost the same as for portal-server. First, create a directory (folder) to store the configuration file.
PS C:\Users\foo> mkdir $HOME\.config\ISEKAI-portal
Next, log in while agreeing to the privacy policy. Note that from the second time onward, such as when you want to log in with a different account, --accept-privacy-policy is not necessary.
PS C:\Users\foo> portal-client --key $HOME\.config\ISEKAI-portal\portal-client.pem --login --accept-privacy-policy
Enter the URL output as before into a web browser and log in (for organization selection, click "Continue with personal account"). Here, use the account created earlier to log in (since it can be configured to accept connections from Endpoints of different users, there is no problem with creating a new separate account).
Finally, find out the Endpoint ID.
PS C:\Users\foo> portal-client --key $HOME\.config\ISEKAI-portal\portal-client.pem --whoami
A string starting with "ep:" is output, and this is the Endpoint ID. It will be needed when creating a Grant, so make a note of it.
Issuing a Grant
There are various ways to issue a Grant, but here I will introduce how to issue one manually from the dashboard. This method can be used as long as the destination portal-server is running.
First, access the ISEKAI link dashboard with a web browser. Since login is required, enter the information of the account you are logged in with on portal-server (as mentioned repeatedly, for organization selection, click "Continue with personal account").
Once logged in, a menu appears at the top, so click "Grant" ("Grants" in the English version). You will move to the Grant screen, so fill in the "Create a grant" form ("Grantを作る" in the Japanese version). The Listener should be listed among those displayed when portal-server was started during setup, so select it. In the text input for "Endpoint to let in" ("入れる相手の Endpoint" in the Japanese version), enter the Endpoint ID of portal-client that you noted earlier. "Lifetime" ("寿命" in the Japanese version) is the expiration period of the Grant to be created. Choose from 1 hour, 8 hours, or 24 hours. The "Label" text input ("ラベル" in the Japanese version) allows you to enter a memo for your own management. Here, enter "a2a". Once you have finished entering the information, click the "Create grant" button ("Grant を作る").
This completes the setup.
Actually connecting
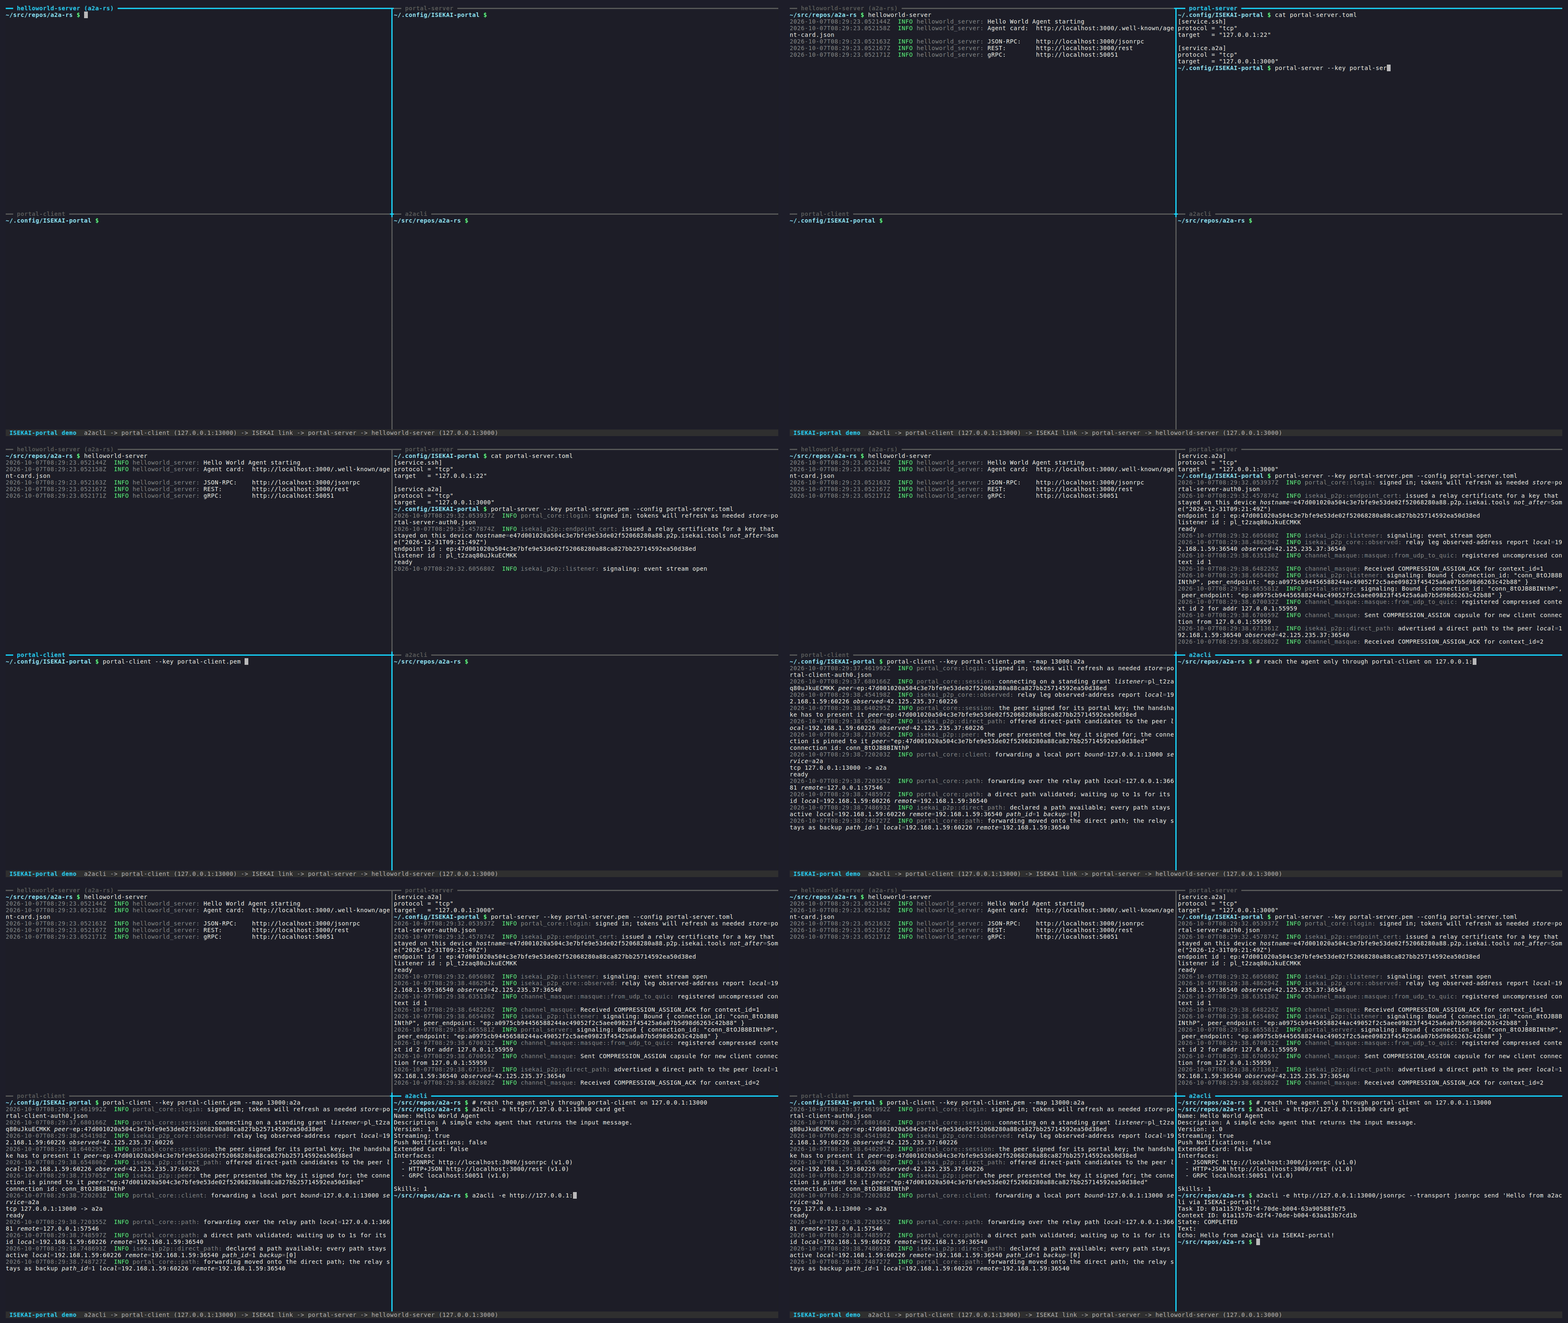
First, start portal-client on the local Windows machine and connect to portal-server on the remote Linux machine. --register is required only on the first startup (adding it from the second time onward will cause an error). The meaning of the --map argument is to accept connections on TCP port 3000 of the local host and forward those connections to the a2a destination specified by portal-server. The reason portal-client listens on TCP port 3000 is that a2acli's default connection destination is TCP port 3000.
PS C:\Users\foo> portal-client --key $HOME\.config\ISEKAI-portal\portal-client.pem --map 3000:a2a --register
After starting, if the following string is output, it is successful.
tcp 127.0.0.1:3000 -> a2a
ready
Next, on the remote Linux machine, perform the work of launching helloworld-server, which is an A2A sample server. The portal-server you started earlier is running in the foreground, so leave that session as is and perform the following work either by connecting with a new ssh session or by starting a new session with tmux, etc. (in the case of ssh, local port forwarding is not necessary).
First, clone the a2a-rs repository.
$ git clone https://github.com/a2aproject/a2a-rs.git
$ cd a2a-rs
Next, modify helloworld-server.
$ vi examples/src/helloworld/server.rs
The modifications are as follows.
--- a/examples/src/helloworld/server.rs
+++ b/examples/src/helloworld/server.rs
@@ -53,8 +53,8 @@ async fn main() {
     tracing::info!("REST:        http://localhost:3000/rest");
     tracing::info!("gRPC:        http://localhost:50051");

-    let http_listener = tokio::net::TcpListener::bind("0.0.0.0:3000").await.unwrap();
-    let grpc_listener = tokio::net::TcpListener::bind("0.0.0.0:50051")
+    let http_listener = tokio::net::TcpListener::bind("127.0.0.1:3000").await.unwrap();
+    let grpc_listener = tokio::net::TcpListener::bind("127.0.0.1:50051")
         .await
         .unwrap();
This modification is made because, by default, the helloworld-server service may be exposed to the internet. helloworld-server is written to listen on the address 0.0.0.0. To prevent this, we rewrite the listening address to 127.0.0.1.
After rewriting, run cargo run as follows.
$ cargo run -p examples --bin helloworld-server
Then, in a separate session, verify that it is only listening on localhost.
$ ss -tlnp | grep "hello"
If the listening address is 127.0.0.1 as shown below, it is successful.
LISTEN 0      128                      127.0.0.1:3000       0.0.0.0:*    users:(("helloworld-serv",pid=1732081,fd=9))
LISTEN 0      128                      127.0.0.1:50051      0.0.0.0:*    users:(("helloworld-serv",pid=1732081,fd=10))
Finally, start a2acli on the local Windows machine. By default, a2acli connects to TCP port 3000 on localhost via HTTP, so it connects to the portal-client started earlier and is forwarded to helloworld-server on the remote Linux machine.
PS C:\Users\foo> git clone https://github.com/a2aproject/a2a-rs.git
PS C:\Users\foo> cd a2a-rs
PS C:\Users\foo\a2a-rs> cargo run --bin a2acli -- card get
If the connection succeeds, a string like the following is output.
Name: Hello World Agent
Description: A simple echo agent that returns the input message.
Version: 1.0
Streaming: true
Push Notifications: false
Extended Card: false
Interfaces:
  - JSONRPC http://localhost:3000/jsonrpc (v1.0)
  - HTTP+JSON http://localhost:3000/rest (v1.0)
  - GRPC localhost:50051 (v1.0)

Skills: 1
Let's also try running a task. Run it as follows.
PS C:\Users\foo\a2a-rs> cargo run --bin a2acli -- send "hello from rust"
If a string like the following is output, it is successful.
Task ID: 01a119a8-885d-76dc-abde-1dea996fc2e4
Context ID: 01a119a8-885d-76dc-abde-1debf9b5c586
State: COMPLETED
Text:
Echo: hello from rust
In this way, we were able to communicate via A2A through ISEKAI portal. Note that GRPC is not forwarded, so it cannot be used in this example.
Summary
In this article, I introduced an example of connecting from a2acli on Windows to helloworld-server on Linux via A2A through ISEKAI portal.
What I would like you to pay attention to here is that no configuration for accepting external connections is performed at all on the Linux side running helloworld-server. portal-server only connects outbound to ISEKAI link. Therefore, there is no need to change firewall or router settings, and the agent is never directly exposed to the internet.
Also, who can connect is managed by Grants. This time, only the Endpoint of portal-client was specified as the connection partner, and an expiration period was also set. For parties without an issued Grant, portal-server does not reveal what Listeners are open, so they cannot even know that the service exists. Moreover, even for parties with an issued Grant, once the period expires, they can no longer connect.
Applying this to the example at the beginning, the tax accountant firm can let only the client company's accounting agent use the tax check agent for the necessary period, without making it publicly available. A2A provides a common language for connecting agents to each other, but "which parties to open to and to what extent" needs to be considered separately. ISEKAI portal can take on that role.
This time it was a minimal example of retrieving the Agent Card and exchanging messages, but any service that runs on TCP or UDP can be forwarded using the same procedure. Please try it with your own agents and services as well.
A2A (Agent2Agent) はAIエージェント同士が連携するためのプロトコルです。A2A を使うことで、異なるベンダーや異なるフレームワークで作られたAIエージェント同士でやり取りをすることが可能になります。やり取りの例としては、社内の「経理エージェント」(クライアント)が、外部の税理士事務所が運営する「税務チェックエージェント」(リモート)に、月次仕訳のチェックを依頼する、というようなものが考えられます。
この例において、外部の税理士事務所は、税務チェックエージェントをインターネット上に一般公開はしたくないと考えたとしましょう。そのようなニーズに応えるため、セーラ・ネットワークス株式会社では ISEKAI portal を開発・公開しています。ISEKAI portal は、過去の記事で仕組みを紹介した ISEKAI link の上で動くアプリケーションです。この記事では、その実証として、Rust で書かれた A2A の実装である a2a-rs に含まれる helloworld-server に ISEKAI portal を経由して、a2a-rs に含まれる a2acli を使って繋ぐ例を紹介してみようと思います。
なお、この記事の中で Endpoint や Grant などの ISEKAI link の用語が登場します。Endpoint は鍵で識別される端点、Grant は特定の Endpoint に Listener への接続を許可する期限付きの許可です。Listener は portal-server などが接続を待ち受ける窓口です。詳しくは、過去の記事を参照してください。
また、a2a-rs を使用するので、ローカルの Windows、リモートの Linux 共に Rust ツールチェーンと git が必要です。Windows では、MSVC のビルドツール(Visual Studio Build Tools)も必要です。
ISEKAI portal のインストール
ISEKAI portal は MITライセンスでソースコードを公開しているので、レポジトリ を clone して、ビルドすることもできます。しかし、ビルドの作業 は少し手間なので、ビルド済のバイナリを Releases からダウンロードするのが便利です。バイナリは現在
- Windows (amd64)
- Linux (Ubuntu, amd64)
- Mac (arm64)
の3種類を用意しています。バイナリはいずれも zip 形式になっており、展開するとファイル名と同じ名前のディレクトリができるので(Windowsだと、portal-windows-latest)、そこにパスを通します。これでターミナル上から実行する準備ができました。
ISEKAI portal のセットアップ
インストールができたら、セットアップを行います。なお、以下ではサーバーを Linux 上で、クライアントを Windows 上で動かすという前提で説明します。
portal-server のセットアップ
セットアップのための準備
サーバーを動かす Linux にリモートアクセスしている場合、次のように ssh を使って TCP の 38700 ポートをローカルに転送するようにします。
PS C:\Users\foo> ssh -L 38700:127.0.0.1:38700 foo@bar.example.com
後述するようにログインを Webブラウザ で行う必要があり、ログイン後に Webブラウザ が portal-server が開いているTCP の 38700 ポートに接続するようになっているのですが、リモートアクセスしている場合には、TCP の 38700 ポートが開いているのはリモートの Linux であり、これをローカルの環境に転送してあげる必要があるわけです。この処理は Linux をローカルで操作している場合は必要ありません。
また、ISEKAI portal が利用する設定ファイルを保存するディレクトリを作っておきます。
$ mkdir -p ~/.config/ISEKAI-portal
プライバシーポリシーへの同意
ISEKAI linkを利用するにはサインアップが必要になりますが、その際に収集する個人情報の扱い方を定めたプライバシーポリシーに同意をいただくことにしています。portal-server を起動するとプライバシーポリシーが表示されますので、確認の上、以下のコマンドを実行して同意してください。同意がなされるまで、portal-server はプライバシーポリシーを表示して終了します。
$ portal-server --accept-privacy-policy
なお、プライバシーポリシーは Web上でも公開しています(日本語版および英語版)。
ログイン
ISEKAI link では Auth0 を用いてアカウント管理を行っています。利用のためにはログインが必要です。ログインするためには次のコマンドを実行します(--keyオプションは Endpoint の秘密鍵のファイルを指定するものですが、ログイン情報を保存するファイルが同じディレクトリに作られるのでここでも指定しています)。
$ portal-server --key ~/.config/ISEKAI-portal/portal-server.pem --login
起動するとURLが表示されるので、Webブラウザ でアクセスしてください。アクセスすると"Enter Your Organization"と表示された画面がでますので、"Continue with personal account"をクリックします。すると、"Welcome"と表示されたログイン画面がでるので、アカウントが既にある場合はログインしてください。アカウントがない場合は"Sign up"をクリックしてアカウント作成画面に移ります。アカウントはメールアドレスとパスワードで作成できますが、Googleのアカウントやgithubのアカウントで作成することもできます。
設定ファイルの作成
ISEKAI portal では接続先の情報をサービスの名前で指定します。その設定を行うのが portal-server の設定ファイルです。ここでは、~/.config/ISEKAI-portal/portal-server.toml という名前で次のような内容で保存します。
[service.a2a]
protocol = "tcp"
target   = "127.0.0.1:3000"
portal-server の起動
起動の準備ができたので、portal-server を次のように実行します。--key は秘密鍵のパスを指定するもので、ファイルがない場合、秘密鍵を生成します。ファイルがある場合はそこから秘密鍵を読み取ります。--registerは Endpoint がまだ登録されていない場合にはつける必要があります。初回起動時は秘密鍵を生成して新しい Endpoint を作っていますので、--register が必要です。2回目以降はつけないようにします(つけるとエラーになります)。
$ portal-server --key ~/.config/ISEKAI-portal/portal-server.pem --config ~/.config/ISEKAI-portal/portal-server.toml --register
portal-client のセットアップ
portal-client のセットアップは portal-server とほとんど同じです。まず、設定ファイルを保存するディレクトリ(フォルダ)を作成します。
PS C:\Users\foo> mkdir $HOME\.config\ISEKAI-portal
次にプライバシーポリシーに同意しつつ、ログインを行います。なお、ログインを別のアカウントで行いたい場合など、2回目以降では、--accept-privacy-policyは必要ありません。
PS C:\Users\foo> portal-client --key $HOME\.config\ISEKAI-portal\portal-client.pem --login --accept-privacy-policy
先ほどと同様に出力された URL を Webブラウザ に入力してログインします(組織の選択では、"Continue with personal account"をクリックしてください)。ここでは、ログインするアカウントに先ほど作成したものを使います(異なるユーザーの Endpoint からでも接続を受け付けるように設定できるので、新しく別のアカウントを作っても問題はありません)。
最後に Endpoint ID を調べます。
PS C:\Users\foo> portal-client --key $HOME\.config\ISEKAI-portal\portal-client.pem --whoami
"ep:"から続く文字列が出力されますが、これが Endpoint ID です。Grantを作成する際に必要になるので、メモしておきます。
Grant の発行
Grant を発行する方法はいろいろありますが、ここではダッシュボードから手動で発行する方法を紹介します。この方法は接続先の portal-server が起動した状態であれば使うことができます。
まず、Webブラウザ で ISEKAI link ダッシュボード にアクセスします。ログインが必要なので、portal-server でログインしているアカウントの情報を入力してください(繰り返しになりますが、組織の選択では、"Continue with personal account"をクリックしてください)。
ログインすると一番上にメニューがあるので、"Grant"をクリックします(英語版の場合は"Grants")。Grantの画面に移るので、"Grantを作る"のフォーム(英語版の場合は"Create a grant")を埋めます。Listenerは portal-server のセットアップで起動した際に出ているものが一覧にあるはずなので、それを選びます。"入れる相手の Endpoint"のテキスト入力(英語版の場合は"Endpoint to let in")に先ほどメモしておいた portal-client の Endpoint ID を入力します。"寿命"(英語版では"Lifetime")は作成する Grant の有効期限です。1時間、8時間、24時間の中から選びます。"ラベル"のテキスト入力(英語版の場合は"Label")は自分で管理するためのメモを入力できます。ここでは"a2a"と入力しておきましょう。入力を終えたら、"Grant を作る"のボタンをクリックします("Create grant")。
これでセットアップは完了です。
実際に接続してみる
まず、ローカルの Windows で portal-client を起動して、リモートの Linux の portal-server に接続します。--registerは初回起動時のみ必要です(2回目以降につけるとエラーになります)。--mapの引数の意味は、ローカルホストの TCP 3000 ポートで接続を受け付け、その接続を portal-server が指定する a2a の宛先に転送するという意味です。portal-client のリスニングを TCP 3000 ポートにしているのは、a2acli のデフォルトの接続先が TCP 3000 ポートになっているからです。
PS C:\Users\foo> portal-client --key $HOME\.config\ISEKAI-portal\portal-client.pem --map 3000:a2a --register
起動した後、次の文字列が出力されれば成功です。
tcp 127.0.0.1:3000 -> a2a
ready
次にリモートの Linux で、A2Aのサンプルサーバーである helloworld-server を立ち上げる作業を行います。先ほど立ち上げた portal-server はフォアグラウンドで動いていますので、そのセッションはそのままにして、以下の作業は新しく ssh で接続して行うか、tmux などで新しくセッションを立ち上げて行ってください(ssh の場合、ローカルポートのフォワードは必要ありません)。
最初に a2a-rs のレポジトリを clone します。
$ git clone https://github.com/a2aproject/a2a-rs.git
$ cd a2a-rs
次に、helloworld-server の修正を行います。
$ vi examples/src/helloworld/server.rs
修正内容は次の通りです。
--- a/examples/src/helloworld/server.rs
+++ b/examples/src/helloworld/server.rs
@@ -53,8 +53,8 @@ async fn main() {
     tracing::info!("REST:        http://localhost:3000/rest");
     tracing::info!("gRPC:        http://localhost:50051");

-    let http_listener = tokio::net::TcpListener::bind("0.0.0.0:3000").await.unwrap();
-    let grpc_listener = tokio::net::TcpListener::bind("0.0.0.0:50051")
+    let http_listener = tokio::net::TcpListener::bind("127.0.0.1:3000").await.unwrap();
+    let grpc_listener = tokio::net::TcpListener::bind("127.0.0.1:50051")
         .await
         .unwrap();
この修正を行うのは、デフォルトでは、helloworld-server のサービスがインターネットに公開されてしまう可能性があるからです。helloworld-server はアドレス 0.0.0.0 を使ってリスニングするように書かれています。これを防ぐため、リスニングするアドレスを 127.0.0.1 に書き換えるわけです。
書き換え後、次のように cargo run を実行します。
$ cargo run -p examples --bin helloworld-server
その後、別のセッションでローカルホストでしかリスニングしていないことを確かめます。
$ ss -tlnp | grep "hello"
次のようにリスニングしているアドレスが 127.0.0.1 になっていれば成功です。
LISTEN 0      128                      127.0.0.1:3000       0.0.0.0:*    users:(("helloworld-serv",pid=1732081,fd=9))
LISTEN 0      128                      127.0.0.1:50051      0.0.0.0:*    users:(("helloworld-serv",pid=1732081,fd=10))
最後にローカルの Windows で、a2acli を起動します。a2acli はデフォルトでは localhost の TCP 3000 ポートに HTTP で接続するようになっているので、先ほど立ち上げた portal-client に接続し、リモートの Linux の helloworld-server へと転送されることになります。
PS C:\Users\foo> git clone https://github.com/a2aproject/a2a-rs.git
PS C:\Users\foo> cd a2a-rs
PS C:\Users\foo\a2a-rs> cargo run --bin a2acli -- card get
接続に成功すると次のような文字列が出力されます。
Name: Hello World Agent
Description: A simple echo agent that returns the input message.
Version: 1.0
Streaming: true
Push Notifications: false
Extended Card: false
Interfaces:
  - JSONRPC http://localhost:3000/jsonrpc (v1.0)
  - HTTP+JSON http://localhost:3000/rest (v1.0)
  - GRPC localhost:50051 (v1.0)

Skills: 1
タスクも実行してみます。次のように実行します。
PS C:\Users\foo\a2a-rs> cargo run --bin a2acli -- send "hello from rust"
次のような文字列が出力されれば成功です。
Task ID: 01a119a8-885d-76dc-abde-1dea996fc2e4
Context ID: 01a119a8-885d-76dc-abde-1debf9b5c586
State: COMPLETED
Text:
Echo: hello from rust
このようにして ISEKAI portal を経由して A2A でやり取りすることができました。なお、GRPCについては転送するようにしていないので、今回は使えないことに注意してください。
まとめ
この記事では、ISEKAI portal を経由して、Linux 上の helloworld-server に Windows 上の a2acli から A2A で接続する例を紹介しました。
ここで注目していただきたいのは、helloworld-server を動かしている Linux 側で、外部からの接続を受け付けるための設定を一切行っていないことです。portal-server は ISEKAI link に自分から接続しに行くだけです。そのため、ファイアウォールやルーターの設定を変える必要はなく、エージェントがインターネットに直接さらされることもありません。
また、誰が接続できるかは Grant で管理されます。今回は portal-client の Endpoint だけを接続相手として指定し、有効期限も付けました。Grant を発行していない相手には、portal-server がどのような Listener を開いているかが見えないので、サービスがあることすら分かりません。また、Grant を発行した相手であっても、期限が切れれば接続できなくなります。
冒頭の例に当てはめると、税理士事務所は税務チェックエージェントを一般公開しないまま、顧客企業の経理エージェントにだけ、必要な期間だけ使わせることができます。A2A はエージェント同士をつなぐ共通の言葉を提供しますが、「どの相手にどこまで開くか」は別に考える必要があります。ISEKAI portal は、その部分を担うことができます。
今回は Agent Card の取得とメッセージのやり取りという最小限の例でしたが、TCP や UDP で動くサービスであれば同じ手順で転送できます。ぜひ手元のエージェントやサービスでも試してみてください。